issues.app (4): Authentication
User sessions, password hashing and database storage.
As of the last codebase revision, we have ourselves the skeleton of (what will hopefully become) a fully-fledged web application. This writeup will document the creation of an authentication system that lets users use the application in certain ways, depending on whether the system can confirm their identity (e.g., with a username/password). The system is comprised of (a) a database (SQLite) that holds user credentials, and (b) user sessions in the browser to keep track of authenticated state.
Note that my approach mirrors that of Miguel Grinberg’s in his Flask Web Development book. While there are a few moving parts to this solution, the Python packages involved are easy to use and work well together. Perfect for a webapp novice like myself.
Table of Contents
Installing a database framework
To implement the database, we will be using SQLAlchemy. There are many advantages to using this high-level framework but perhaps the biggest one is that it allows for the definition of the database schema through Python classes. This is really convenient, as you will see later. SQLAlchemy gives us the choice of most popular database engines. For the sake of simplicity, I will run with SQLite.
As with many nice things, SQLAlchemy has a matching Flask extension: Flask-SQLAlchemy. This is installed in the usual way:
pip install flask-sqlalchemy
Configuring SQLAlchemy
Flask-SQLAlchemy picks up its
configuration from the Flask application instance. As was done for the Bootstrap object, we need to create the database object and bind it to the app instance with the init_app() method.
src/init.py
...
from flask_sqlalchemy import SQLAlchemy

bootstrap = Bootstrap()
db = SQLAlchemy()

def create_app(config_name):
    app = Flask(__name__, template_folder='./templates', static_folder='./static')
    app.config.from_object(config[config_name])

    bootstrap.init_app(app)
    db.init_app(app)
    ...
    return app
Now we will configure Flask-SQLAlchemy. The most important parameter is SQLALCHEMY_DATABASE_URI, which takes as its value the URL of the database file. It’s good practice to work on a separate database for each configuration – an accidental modification of the production database could be painful.
On Windows, an SQLite URL take the form sqlite:///<DATABASE-PATH>, like sqlite:///c:/issues.app/data.sqlite. For testing instances, setting the URL to sqlite:// tells SQLAlchemy to create the database in memory, essentially as a throwaway database.
config.py
import os
basedir = os.path.abspath(os.path.dirname(__file__))

class Config:
    SECRET_KEY = os.environ.get('SECRET_KEY') # needed for tamper-proof session cookies
    SQLALCHEMY_TRACK_MODIFICATIONS = False # disable event system and conserve memory

class DevelopmentConfig(Config):
    # enables interactive debugger on the development server
    # also useful for monitoring code changes
    DEBUG = True
    SQLALCHEMY_DATABASE_URI = 'sqlite:///' + os.path.join(basedir, 'data-dev.sqlite')

class TestingConfig(Config):
    TESTING = True # disables error catching during request handling
    SQLALCHEMY_DATABASE_URI = 'sqlite://' # test data stored in memory

class ProductionConfig(Config):
    SQLALCHEMY_DATABASE_URI = 'sqlite:///' + os.path.join(basedir, 'data.sqlite')

config = {
    'development': DevelopmentConfig,
    'testing': TestingConfig,
    'production': ProductionConfig,
    'default': DevelopmentConfig
}
We will also set SQLALCHEMY_TRACK_MODIFICATIONS = False to conserve system resources as suggested in Flask-SQLAlchemy’s documentation. Note that once we start testing the database, Pytest will complain if this parameter has not been specified.
Defining database models
If you’re used to working with relational databases the old fashioned way, using a framework like SQLAlchemy will feel very different. For example, instead of using DDL queries like CREATE and ALTER to build a table, we need to write a special kind of Python class that inherits from SQLAlchemy’s Model base class and whose attributes define the table columns.
We are going to kick things off with a single table. The User
model below defines a table with four columns:
id(integer), a unique identifying number for each user,email(string, max length 64), the user’s emailusername(string, max length 32), as it sounds, andpassword_hash(string), an encoded version of the user’s password (described later).
src/models.py
from . import db

class User(db.Model):
    __tablename__ = 'users'
    id = db.Column(db.Integer, primary_key=True)
    email = db.Column(db.String(64), unique=True, index=True, nullable=False)
    username = db.Column(db.String(32), unique=True, index=True, nullable=False)
    password_hash = db.Column(db.String(128))

    def __repr__(self):
        return f'<User {self.username}>'
Setting index=True tells SQLAlchemy to build an index for the column, which makes queries more efficient. We also don’t want to allow null values for the id, email and username columns (this is automatic for primary keys).
Creating the database
With the model defined, our next task is to create the database. Running flask shell will start
an interactive Python shell in the context of the application. The first order of business is to import the SQLAlchemy instance and run db.create_all(), which creates the database and any tables that are defined by the model files.
ROOTDIR> flask shell
>>> from src import db
>>> db.create_all()
With the default development configuration in effect, this will create a data-dev.sqlite file in the base directory.
Let’s create a couple of users and inspect their properties.
>>> from src.models import User
>>> u1 = User(email='bert@gmail.com', username='bert')
>>> u2 = User(email='ernie@yahoo.com', username='ernie')
>>> print(u1)
<User bert>
>>> print(u1.id)
None
>>> print(u1.email)
bert@gmail.com
>>> print(u2)
<User ernie>
>>> print(u2.id)
None
>>> print(u2.email)
ernie@yahoo.com
From the output above, it looks as though the ID properties haven’t been set properly. This is because although we have made some Python objects, any primary key properties won’t take values until the objects have been written to the database. This is done by adding them to a session, and then committing the session:
>>> db.session.add(u1)
>>> db.session.add(u2)
>>> db.session.commit()
>>> print(u1.id)
1
>>> print(u2.id)
2
A list of all users in the table can now be obtained by querying the user model:
>>> User.query.all()
[<User bert>, <User ernie>]
Implementing password hashes
Storing cleartext passwords within a database is almost certainly a bad idea. If a hacker gains access to the database, the credentials of all users can be easily accessed and any sensitive information stored on the application server becomes fair game. It is important to store passwords securely to prevent or at least mitigate these kinds of risks.
Instead of storing a raw password, the database can instead keep track of its corresponding hash. This involves using a hash function to transform the password into a string of random-looking characters. For example, we can use a
bcrypt hash function to convert the meepmeep password into
$2a$04$cT3a9teblhIemCmmXjXQleoxjovVhoRddfm9DR6tZWeuDRETIn5hK
which looks nothing like the original password. Hash functions also make use of a random component to salt the hash, such that using the function twice on the same input results in completely different outputs. More importantly, hash functions are “one-way”, meaning that while computation of the hash is relatively fast, the inverse operation (i.e., recovering the password from the hash) is practically impossible.
We can use the
Werkzeug package to do the heavy lifting for us, using the generate_password_hash() and check_password_hash() functions to handle hash generation and verification. The idea here is to update the User model class such that a model instance (e.g., u1 in the example above) can be used to set a write-only password attribute, which generates the password_hash attribute when the password is written. The model also makes the verify_password() method available to the application so that Werkzeug can compare the user’s password hash with that of the second input argument.
src/models.py
from . import db
from werkzeug.security import generate_password_hash, check_password_hash

class User(db.Model):
    ...
    @property
    def password(self):
        raise AttributeError('password is not readable')

    @password.setter
    def password(self, password):
        self.password_hash = generate_password_hash(password)

    def verify_password(self, password):
        return check_password_hash(self.password_hash, password)
We can now create a new user entry to demonstrate how this works. Grover has the honor of being the first user to be assigned a password, so we’ll commit his credentials to the database and eventually use them to log into the system.
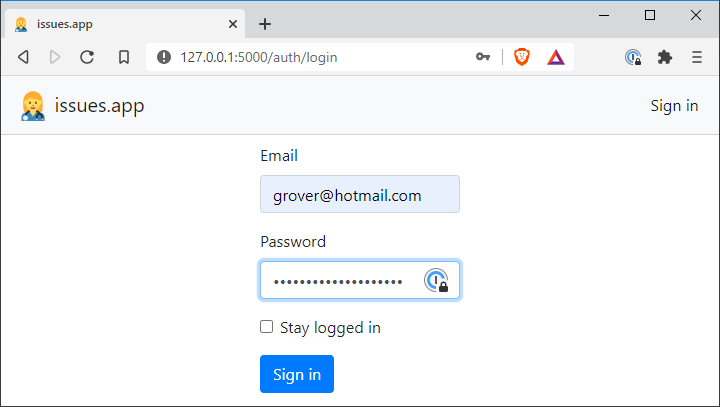
>>> u = User(email='grover@hotmail.com', username='grover')
>>> print(u)
<User grover>
>>> u.password = 'imbluedabadeedabadaa'
>>> print(u.password_hash)
pbkdf2:sha256:150000$KpvVu5xH$0fb90391c70c36c82d5e6760aa8925bbfaafb8f9f482b482ad8b34bd9f452c3
>>> print(u.password)
# raises AttributeError: password is not readable
>>> db.session.add(u)
>>> db.session.commit()
Testing the database
It’s a good idea to write some basic unit tests to make sure any future changes to our code don’t break this functionality. Below is a set of three tests that validate our expectations for how passwords should be accessed and validated.
tests/test_user_model.py
from src.models import User
import pytest

def test_password_setter():
    u = User(password='meep')
    assert u.password_hash is not None

def test_unreadable_password():
    u = User(password='meep')
    with pytest.raises(AttributeError):
        u.password

def test_password_verification():
    u = User(password='meep')
    assert u.verify_password('meep') == True
    assert u.verify_password('beep') == False
Running pytest confirms that all is well.
==================================== test session starts ====================================
platform win32 -- Python 3.7.7, pytest-6.0.1, py-1.9.0, pluggy-0.13.1
rootdir: C:\Users\alexh\Workspace\python\issues
plugins: flask-1.0.0
collected 6 items

tests\test_suite.py ...                                                                [ 50%]
tests\test_user_model.py ...                                                           [100%]

===================================== 6 passed in 0.64s =====================================
Implementing user authentication
Now that the database has some idea of who should be able to use the app (i.e., Grover), the next step is to implement user authentication. The general goal is to display different information to the user, depending on whether they have been authenticated. At minimum, we need a login page that accepts a username/password pair and communicates with the database to determine whether the credentials are valid.
Just as we have a main blueprint for organizing project-related view functions (project, issues, messages, etc.), we will also have an auth blueprint. There will be two view functions in this blueprint: one to handle user login and the other user logout. We will also need a form to accept and submit user credentials. All of these will be placed in an auth folder, which in turn sits inside the project source code directory.
Login form
To implement the login form, we will use the Flask-WTF extension. As was done for the user database model, the form is implemented as a Python class that inherits from FlaskForm, a special base class. It’s a pretty simple form, with two text fields for the user credentials, a checkbox to indicate a preference for staying logged in, and a submit button. Flask-WTF also makes it easy to implement
data validation, which is very convenient.
src/auth/forms.py
from flask_wtf import FlaskForm
from wtforms import StringField, PasswordField, BooleanField, SubmitField
from wtforms.validators import DataRequired, Length, Email

class LoginForm(FlaskForm):
    email = StringField('Email', validators=[DataRequired(), Length(1, 64), Email()])
    password = PasswordField('Password', validators=[DataRequired()])
    remember_me = BooleanField('Stay logged in')
    submit = SubmitField('Sign in')
User session management
After the user has correctly entered their credentials, we need to update the application state to reflect that the user has been authenticated. This is handled through another Flask extension, Flask-Login, that integrates nicely with the user model to keep track of authentication state.
Flask-Login requires our User class to implement
several properties and methods. This can be achieved by inheriting from Flask-Login’s UserMixin class. We will be checking the is_authenticated property in the HTML templates to test whether ‘authorized’ content (i.e., a personalized greeting) should be displayed to the user.
The final requirement of the User class is that it implements the load_user() function. Flask-Login supplies this function with a user ID and expects to receive the corresponding user object. The login_manager.user_loader decorator is used to register the callback with Flask-Login.
src/auth/views.py
...
from . import db, login_manager

@login_manager.user_loader
def load_user(user_id):
    return User.query.get(int(user_id))
...
View functions
All the components that have been discussed so far — password validation, database access, user authentication — will come together in the authorization view functions. When the login page is requested, the login form will be sent to the user. If the user submits sensible-looking data, the application will first query the database to find a user whose email matches the one entered by the user. If either (a) no such user exists or (b) the password hashes don’t match, the application flashes an appropriate message and simply returns to the login form.
src/auth/views.py
from flask import render_template, redirect, request, url_for, flash, session
from flask_login import login_user, logout_user, login_required
from . import auth
from ..models import User
from .forms import LoginForm
@auth.route('/login', methods=['GET', 'POST'])
def login():
form = LoginForm()
if form.validate_on_submit():
# look for the user in the database and verify their password
user = User.query.filter_by(email=form.email.data).first()
if user is not None and user.verify_password(form.password.data):
login_user(user, form.remember_me.data)
next = request.args.get('next')
if next is None or not next.startswith('/'):
# store some dummy data in the user session
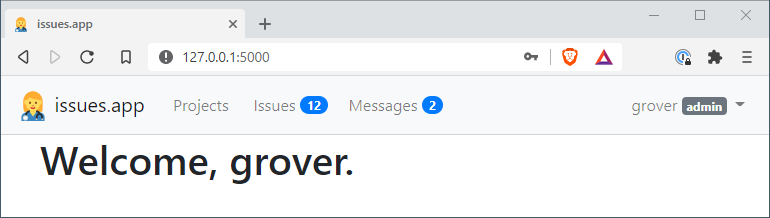
session['user_data'] = {
'username': user.username,
'role': 'admin',
'num_issues': 12,
'num_messages': 2
}
next = url_for('main.index')
return redirect(next)
flash('Invalid username or password')
return render_template('auth/login.html', form=form)
@auth.route('/logout')
@login_required
def logout():
logout_user()
flash('You have been signed out.')
return redirect(url_for('main.index'))
The code that runs when a user logs in successfully is a little more complicated. After we tell Flask-Login that all went well (login_user()), the next attribute in the request needs to be tested. If the login form showed up because the unauthorized user tried to access a protected page, next will hold the URL of that page and redirect to it. Otherwise, if next is empty, the user is directed to the default main.index endpoint. Before the redirect kicks in, the username (including some extra dummy information) is stored in the user session, to be accessed by the HTML templates.
next URL to start with a slash, which indicates an absolute path (instead of a relative path). Allowing absolute redirects creates an opportunity for an attacker to redirect users to a site of their choosing. This is probably not a good thing!
Grover signs in
All that’s left to do is give it a try!

git checkout f902914 to get the current version of the source code.
Summary
Authorization deserves careful consideration in any application that holds sensitive information. The next steps for this project might involve creating user roles (e.g., administrator, manager, developer) that permit specific application functionality, including the ability to perform CRUD operations on projects, issues and messages. But building out the user interface might be more fun…