issues.app (2): Making templates with Bootstrap
A step towards developing interfaces that don’t remind you of Geocities.
The last article ended with a quick mention about how Python functions can be assigned to handle browser requests in a Flask application. It’s a topic that is definitely worth more of our time. We are going to talk about templates: what they are, how they work, and how they can integrate with Bootstrap to make life easier for developers.
Table of Contents
View decorators
In general, decorators are Python constructs that allow you to inject functions with additional capabilities. Flask provides a number of view decorators that can be used to conveniently enable web-specific functionality, making it easy to get things done with minimal code. What follows is a quick tour of some of the most common view decorators you will find in a Flask application.
Static routes
We’ve already seen one of these. A static route can be implemented with the app.route decorator to handle a browser request for a single URL. Here’s what that looks like:
@app.route('/')
def index():
    return '<h1>Show me the money!</h1>'
Dynamic routes
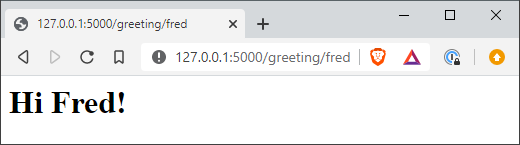
We can write another function that uses a dynamic route to serve a customized greeting to the user, using the name argument. Angle brackets are used in the decorator argument to indicate how the function argument should be parsed from the requested URL.
@app.route('/greeting/<name>')
def greeting(name):
    return f"<h1>Hi {name.capitalize()}!</h1>"
After adding this to src/main/__init__.py and running the server, a trip to /greeting/fred would serve you with the following:
Error handlers
Sometimes it’s nice to provide a customized error page. This can be achieved using the app.errorhandler decorator. The decorated function must have an error object argument. It’s good practice to return the matching error code together with the response.
@app.errorhandler(404)
def not_found(e):
    return "<h1>Looks like I can't find that page...</h1>", 404
Templates
Handling chunks of web code amid our Python source feels a bit dirty. It’s probably not a big deal if our view function is returning a one-line response, but imagine the kind of content that Facebook is serving. We’re talking reams of HTML, stitched together from different sources that need to be filtered and processed according to the user’s data. Sorting this out with a little string interpolation isn’t going to cut it. We need a bigger gun.
This is where templates come in. A template is a like a mold that is used to mass produce web pages. The mold is made out of standard HTML elements like body and div and has slots reserved for data that will become available in the future. When the data is ready, a template engine can take a template, fill the data slots, and render the complete page. This allows for presentation logic to be isolated from the rest of the code, simplifying application maintenance and making debugging a bit less painful.
Jinja templates
Flask uses a template engine called Jinja2 to render templates with data. Jinja templates are usually just HTML files (although other file formats are supported). They will typically contain HTML as well as variables and expressions that are recognized by Jinja and replaced when rendered.
We will now explore some basic Jinja template constructs, with an eye towards making better (or at least more flexible) versions of our greeting functions.
Variables and expressions
Let’s say Jinja is told to render the template below using a name variable equal to 'fred'.
<h1>Hi {{ name }}!</h1>
The {{ ... }} delimiters indicate an expression that Jinja will replace with some kind of output, which in this case is a string literal. Jinja will output Hi fred! after rendering this template.
Variables can also be more complex objects like lists and dictionaries. We’ll see an example of this very soon when we introduce statements.
Filters
Jinja has filters that can be applied to modify variables using the pipe (|) operator. Below are a few examples of templates with their rendered output:
| Variable | Template | Output |
|---|---|---|
name='fred' |
`Hi {{ name | upper }}!` |
name='emma' |
`Hi {{ name | capitalize }}!` |
name=None |
`Hi {{ name | default(‘Stranger’)}}!` |
price=7.283 |
`That is ${{ price | round(2, ‘floor’) }}.` |
{{ name | default('stranger') | upper }} versus that of {{ name | upper | default('stranger') }} when name=None.
Statements
Jinja becomes considerably more powerful when using statements to control the specific elements that are rendered. Statements are indicated by {% ... %} delimiters.
Imagine we have some kind of shopping list. We can use Jinja to create a bulleted list of our items with the following code:
<ul>
{% for item in shopping_list %}
    <li>{{ item }}</li>
{% endfor %}
</ul>
Now if the shopping list contains ["bread", "milk", "eggs", "toy dinosaur"], Jinja will render it as a nice bulleted list (simulated with Markdown):
- bread
- milk
- eggs
- toy dinosaur
Think about our app for a second. Suppose we want to offer up a VIP version of our greeting to users that know the right URL. We can get fancy with our template and have it render a greeting that is sensitive to the time of day, using Jinja to temporarily store different greetings inside variables.
{% if hour >= 0 and hour < 12 %}
    {% set greeting = 'Good morning' %}
{% elif hour >= 12 and hour < 17 %}
    {% set greeting = 'Good afternoon' %}
{% else %}
    {% set greeting = 'Good evening' %}
{% endif %}

<h1>{{ greeting }}, {{ name | capitalize }}.</h1>
In this case the template engine would be dealing with three variables:
nameandhour, supplied by the application, andgreeting, set within the template.
Template inheritance
Before we get our hands on some templates, we should talk about template inheritance. As plain and unexciting as that sounds, you should know that this is the most powerful part of Jinja1. Template inheritance allows you to create a “master template” that holds all of the common web elements of your site as well as blocks that child templates can either build on or completely replace.
To get a better understanding of what we’re talking about, let’s use an example pair of templates: one base, one child. Below is base.html.
base.html
<!DOCTYPE html>
<html>
<head>
    {% block head %}
    <style type="text/css">
        .important { color: #FF0000; }
    </style>
    <title>{% block title %}{% endblock %} :: ACME LLC</title>
    {% endblock %}
</head>
<body>
    {% block content %}{% endblock %}
</body>
</html>
It looks like a regular HTML page seasoned with some Jinja statements. The base template defines three blocks: head, title and content. Each of these can be overridden by a derived template, like the one below:
child.html
{% extends "base.html" %}
{% block title %}Goods and Services{% endblock %}
{% block head %}
    {{ super() }}
    <style type="text/css">
        .special { color: #0000FF; }
    </style>
{% endblock %}
{% block content %}
    <h1>Goods and Services</h1>
    <ul>
        <li>Bread</li>
        <li>Milk</li>
        <li class="important">Eggs</li>
        <li class="special">Toy dinosaur</li>
    </ul>
{% endblock %}
The line that makes it a child template is the very first one. With the {% extends "base.html" %} statement, we are telling Jinja that the current template is inheriting from base.html. When the base and derived templates both contain a nonempty block, the content in the derived block takes precedence.
Note the use of super() within the head block. This tells Jinja to append the block’s content to the corresponding block content in the base template. Without the super() call, the child template would completely replace the base template block and we would lose the important CSS class defined in the base template.
Jinja is capable of a lot more. We will cover more of its features in later articles, but for now let’s make some templates and refactor the codebase to make use of them.
Using templates
First we should designate a folder to keep our templates. This will be src/templates. We are going to make two templates: one for the plain greeting and another for the VIP greeting (we’ll leave the 404 and index view functions “template-less” for now). The plain template is shown below.
src/templates/greeting.html
<h1>Hi {{ name | capitalize }}!</h1>
And here’s the fancy one.
src/templates/fancy-greeting.html
{# time-sensitive greeting #}
{% if hour >= 0 and hour < 12 %}
    {% set greeting = 'Good morning' %}
{% elif hour >= 12 and hour < 17 %}
    {% set greeting = 'Good afternoon' %}
{% else %}
    {% set greeting = 'Good evening' %}
{% endif %}

<h1>{{ greeting }}, {{ name | capitalize }}.</h1>
<p>GreetMaster™: delivering you the finest of greetings.</p>
Now we need a way to engage the template engine in our app. This is done using render_template(), which comes from the flask package. Each view function supplies render_template() with the appropriate template filename and any keyword arguments that Jinja needs to populate the corresponding variables in the template.
src/main/init.py
# ...
from flask import render_template
from datetime import datetime

def create_app(config_name):
    # ...
    @app.route('/greeting/<name>')
    def greeting(name):
        return render_template('greeting.html', name=name)

    @app.route('/fancy-greeting/<name>')
    def fancy_greeting(name):
        return render_template('fancy_greeting.html',
                name=name,
                hour=datetime.now().hour)

    @app.errorhandler(404)
    def not_found(e):
        return "<h1>Looks like I can't find that page...</h1>", 404

    return app
Finally, Flask needs to be told where we are keeping the templates (otherwise, Flask will assume they are in a templates folder that sits in the same directory as the app’s instantiating file). The create_app() function is changed like this:
src/main/init.py
def create_app(config_name):
    app = Flask(__name__, template_folder='../templates')
    # ...
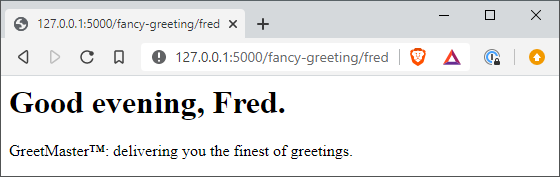
Now we can fire up the server and serve ourselves with a magnificent greeting page. Since I’m typing this up at ~10 PM, I am treated with an evening salutation.
Templates with Bootstrap
Our templates are handy but they’re ugly. Fortunately, a bunch of people at Twitter came up with Bootstrap, an open-source front-end framework that can integrate with Flask and style our templates. We can plug it into our app as a Flask extension with minimal fuss. That’s a big reason you’re reading about it right now.
Plugging Bootstrap into Flask
Adding support for Bootstrap within Flask is easy, thanks to the
Flask-Bootstrap extension. Below we’ll add flask-bootstrap as a project dependency. Make sure to install it in your virtual environment.
setup.py
from setuptools import setup, find_packages

setup(
    name='issues',
    version='0.2',
    packages=find_packages(),
    install_requires=["flask", "pytest", "pytest-flask", "flask-bootstrap"],
)
Bootstrap can now be installed as an app extension using the init_app() instance method within the main package constructor.
src/main/init.py
# ...
from flask import Flask
from flask_bootstrap import Bootstrap

bootstrap = Bootstrap()

def create_app(config_name):
    app = Flask(__name__, template_folder='../templates')
    app.config.from_object(config[config_name])

    bootstrap.init_app(app)
    # ...
It turns out that
all approved Flask extensions will implement the init_app() method. The major upshot of this (application factory) pattern is to allow multiple instances of our application to use a single extension instance. That’s good news for people like us who are interested in using a test framework during development.
Making nicer templates
With the help of Bootstrap, we are going to drag our templates out of the 90s and into the modern age. This is done by having our templates inherit from Flask-Bootstrap’s base template. Let’s see how this works with our fancy greeting template.
src/templates/fancy_greeting.html
{% extends "bootstrap/base.html" %}

{# time-sensitive greeting #}
{% if hour >= 0 and hour < 12 %}
    {% set greeting = 'Good morning' %}
{% elif hour >= 12 and hour < 17 %}
    {% set greeting = 'Good afternoon' %}
{% else %}
    {% set greeting = 'Good evening' %}
{% endif %}

{% block title %}GreetMaster{% endblock %}

{% block content %}
<div class="jumbotron jumbotron-fluid">
    <div class="container">
        <h1 class="display-4">{{ greeting }}, {{ name | capitalize }}.</h1>
        <p class="lead">GreetMaster™: delivering you the finest of greetings.</p>
    </div>
</div>
{% endblock %}
Flask-Bootstrap’s base template provides access to all of Bootstrap’s gadgets, like the jumbotron. If you pull back the curtain and take a look at
the base template, you’ll see that Bootstrap’s files are sourced within the template blocks. After relaunching the server and visiting localhost/fancy-greeting/fred, we will now be greeted with a much nicer page.
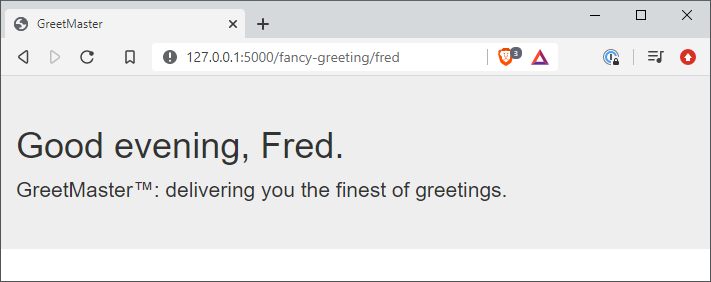
Alright, fine. It’s still pretty plain. But moving away from Times New Roman has to count for something! Take it as one small step towards a modern interface for our app, which we will build up to as we move through the series.
git checkout ff8887e to get the current version of the source code.
Summary
At this stage you might already appreciate the convenience that templates have to offer us. If not, then that’s entirely understandable. After all, we have been putting together some pretty simple pages up until now. Their convenience will be better appreciated once we start sinking our teeth into the prototype interface for the app, which I hope to cover in the next article.
-
Don’t take it from me. The developers say it right here in their documentation! ↩︎