issues.app (3): Modularity with Blueprints
Now featuring a prototype interface and better project structure!
Today I’ll be documenting several structure-related changes that collectively represent a significant change to the codebase. In order of appearance, these changes are as follows:
- switching from Flask-Bootstrap to Bootstrap-Flask (i.e. Bootstrap v3 to v4)
- relocating several source files for more meaningful project structure
- implementation of blueprints for better code modularity.
These are not sexy changes, so to sweeten the deal, I’ve also gone ahead and cooked up the beginnings of a user interface for the project. You’ll get a glimpse of it as I detail the migration of the codebase to Bootstrap-Flask.
Let’s get started!
Table of Contents
Using better templates
The first order of business is to make a base template for the issue tracker. By defining page components and using template blocks (e.g., {% block content %}), a base template can make page components available to a child template, such that the derived page can use or modify the base template’s content. I will use the base template to hold a navbar, a horizontal component on the top of each app page that contains links to other pages, as well as other non-view-specific information (e.g., number of issues assigned to the logged-in user).
Switching to Bootstrap-Flask
One of the issues I discovered with Flask-Bootstrap is that the package uses Bootstrap 3. At first I didn’t see this as an issue, but the more I wanted to play around with the layout, the more time I was sinking into custom CSS changes and fighting the defaults. It’s worth noting that even though I am definitely not an interface designer, nor a master of CSS, I am fussy when it comes to design. By the time I was satisfied with my navbar, more than three hours had passed through a rapid cycle of Google searches, browser element inspection and minute CSS changes. And that’s just a single navbar!
After reading so many Stack Overflow posts containing some variant of “this is resolved in v4”, I pulled the plug on Flask-Bootstrap and replaced it with Bootstrap-Flask, which uses Bootstrap 4. If you are in any doubt about which version to use, take it from me: use v4.
The proto-interface
The first version of our issue tracker interface can be seen below. At this stage it’s really just the navbar with a very plain content page. Most of the what you’re looking at is described by a base template, with the content underneath the navbar filled out by each child template. We have four child templates, one for each major component in the app:
- the dashboard,
- the projects page,
- the issues page,
- the message page.
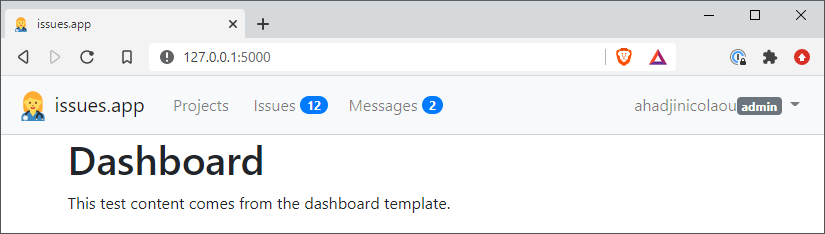
Aside from some links to different application views, the navbar contains some other information. We have a couple of badges: little numerical indicators that hold the number of active issues and unread messages for the user. There’s also a user dropdown menu that lists the username and their role. We will save a proper description of the major data entities underlying this project (users, projects, issues, messages, etc.) for when we get to implementing the project’s database. That will definitely warrant a separate writeup.
Currently, each child template looks almost identical and pretty boring. This is what the dashboard template looks like:
src/templates/dashboard.html
{% extends "base.html" %}

{% block content %}
<div class="container">
    <div class="row">
        <div class="col">
            <h1>Dashboard</h1>
            <p>This test content comes from the dashboard template.</p>
        </div>
    </div>
</div>
{% endblock %}
Unlike Flask-Bootstrap, Bootstrap-Flask does not come with its own base template, so you have to make one. The next section provides an overview of this project’s base template, as well as some important aspects of its design.
The base template
After leading with the DOCTYPE tag, the base template includes some meta tags in the head element that allow for the view to be
responsive, the effects of which will be shown soon. We also have some code that sets the favicon and loads CSS files, including Bootstrap and a custom CSS file for small design tweaks.
src/templates/base.html » <head>
{% block head %}
<!-- required meta tags -->
<meta charset="utf-8">
<meta name="viewport" content="width=device-width, initial-scale=1, shrink-to-fit=no">

<!-- favicon resources -->
<link rel="shortcut icon" href="{{ url_for('static', filename='favicon-16.png') }}" type="image/png">
<link rel="icon" href="{{ url_for('static', filename='favicon-16.png') }}" type="image/png">

{% block styles %}
<!-- bootstrap CSS -->
{{ bootstrap.load_css() }}
<link rel="stylesheet" href="{{ url_for('static', filename='custom.css') }}">
{% endblock %}

<title>issues.app</title>
{% endblock %}
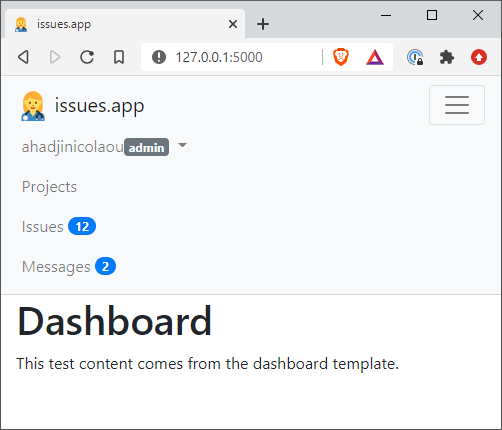
Most of the remaining code is within the body element and is used to define the navbar. Bootstrap is a mobile-first framework, so it’s worth putting a bit of thought into the navbar’s layout for different window sizes. After deciding which components to include in the navbar, we can then choose which components to hide or collapse when the display size is small enough.
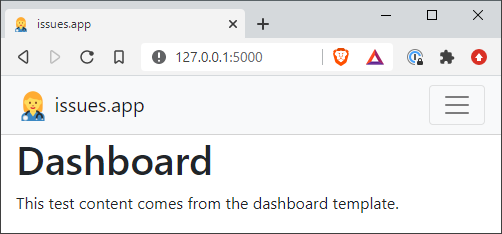
Components can be collapsed by nesting the components within a div.collapse.navbar-collapse element. The .navbar-toggler class is used to bundle collapsed components into a hamburger menu that references the components using the #navbarNavDropdown ID. The navbar-brand element, used to access the dashboard, will always be shown.
src/templates/base.html » <body>
<div class="navbar navbar-fixed-top navbar-expand-md navbar-light bg-light">
<!-- app brand -->
<a class="navbar-brand" href="{{ url_for('index') }}">
<img class="d-inline-block align-top" src="{{ url_for('static', filename='favicon-32.png') }}" >
issues.app
</a>
<!-- hamburger menu -->
<button class="navbar-toggler" type="button" data-toggle="collapse" data-target="#navbarNavDropdown" aria-controls="navbarNavDropdown" aria-expanded="false" aria-label="Toggle navigation">
<span class="navbar-toggler-icon"></span>
</button>
<!-- items below collapse into the menu above-->
<div class="collapse navbar-collapse" id="navbarNavDropdown">
<!-- logged-in user dropdown -->
<ul class="navbar-nav ml-auto order-1">
<li class="nav-item dropdown">
<a class="nav-link dropdown-toggle" href="#" id="navbarUserDropdown" role="button" data-toggle="dropdown" aria-haspopup="true" aria-expanded="false">
{{ user_data['user'] }}<span class="badge badge-secondary">{{ user_data['role'] }}</span><span class="caret"></span>
</a>
<div class="dropdown-menu" aria-labelledby="navbarUserDropdown">
<a class="dropdown-item" href="#">Profile</a>
<a class="dropdown-item" href="#">Settings</a>
<div class="dropdown-divider"></div>
<a class="dropdown-item" href="#">Sign out</a>
</div>
</li>
</ul>
<!-- major app sections -->
<ul class="navbar-nav mr-auto order-0">
<li class="nav-item {{ 'active' if is_active['projects'] }}">
<a class="nav-link d-flex align-items-center" href="{{ url_for('projects') }}">
Projects
</a>
</li>
<li class="nav-item {{ 'active' if is_active['issues'] }}">
<a class="nav-link d-flex align-items-center" href="{{ url_for('issues') }}">
Issues {% if user_data['num_issues'] %}<span class="badge badge-pill badge-primary">{{ user_data['num_issues'] }}</span>{% endif %}
</a>
</li>
<li class="nav-item {{ 'active' if is_active['messages'] }}">
<a class="nav-link d-flex align-items-center" href="{{ url_for('messages') }}">
Messages {% if user_data['num_messages'] %}<span class="badge badge-pill badge-primary">{{ user_data['num_messages'] }}</span>{% endif %}
</a>
</li>
</ul>
</div>
</div>
Looking at the code above, you will notice some Jinja statements sprinkled around the place. The statements that populate the navbar user data access a dictionary called user_data, which is supplied to Jinja through each view function. For example, the projects template is rendered within the projects() view function as shown below.
src/main/init.py » create_app()
@app.route('/projects')
def projects():
    return render_template('projects.html',
        is_active={'projects': True},
        user_data=get_user_data())

def get_user_data():
    return {
      'user': 'ahadjinicolaou',
      'role': 'admin',
      'num_issues': 12,
      'num_messages': 2}
Although the function get_user_data() is just returning some dummy data here, you can imagine this function being rewritten to say, query a Users table in a database and parse the results to create a proper user data dictionary.
Another point worth noting is the use of Flask’s url_for() function. Recall that we declare view functions in our code using the app.route decorator. Flask keeps track of the association between each URL rule (e.g. /projects) and its view function using the app instance’s URL map. You can inspect the URL map for the application by accessing app.url_map within the main package constructor.
Here’s what it looks like:
Map([<Rule '/projects' (HEAD, OPTIONS, GET) -> projects>,
    <Rule '/messages' (HEAD, OPTIONS, GET) -> messages>,
    <Rule '/issues' (HEAD, OPTIONS, GET) -> issues>,
    <Rule '/' (HEAD, OPTIONS, GET) -> index>,
    <Rule '/bootstrap/static/<filename>' (HEAD, OPTIONS, GET) -> bootstrap.static>,
    <Rule '/static/<filename>' (HEAD, OPTIONS, GET) -> static>])
There’s some extra stuff in here that we have yet to discuss, but the main takeaway is that for every URL rule, there is an endpoint that identifies the function Flask should use to handle the associated request. By default, Flask uses the name of the function as the endpoint. We can see that, for instance, a request for /projects will be handled using the projects() function.
We will take another look at this URL map after restructuring our code to use blueprints, but before we get to that, we need to make a quick fix.
Project restructure
As I was looking at my project structure, it dawned on me that the location of some files doesn’t make a lot of sense. I’m looking at issues.py, config.py, and __init__.py, all of which are located in src/main. The first two don’t need to be so deep within the project structure – in fact, they should be in the project root, since they don’t rely on any project-specific packages. There are two consequences of moving these two files:
- the
FLASK_APPenvironment variable should now be set toissues.py, - the
configdictionary within__init__.pyshould now be importedfrom config.
Speaking of __init__.py, since it contains the create_app() factory function, this file should be a package constructor for the src package, rather than the main subpackage. Moving this file to the src directory allows us to keep our project subpackages (containing different functionality for the app) all in one place. The src/main folder (empty at this point) can instead be used to keep our view functions and error response functions, which we will get to as we further modularize the codebase.
Moving __init__.py requires us to make changes to the arguments in the Flask object initializer:
template_folder='./templates',static_folder='./static'.
We also need to update the factory function import statement in the tests/conftest.py file: from src import create_app.
Alright, we’re finally ready to talk blueprints!
Blueprints
One obvious way to better segment our codebase is to somehow isolate our HTML response functions (stuffed within the create_app() factory function) within their own file. There’s a wrinkle in that idea, however: outside of the package constructor, the response functions no longer have access to the app variable, and by extension, the app.route decorator.
Here’s where the Blueprint class can help. A blueprint can be used to store all of these response-serving functions, without being attached to the application instance. All that functionality sits in a dormant state, waiting to be registered with the application. Once registered, the functions get grafted onto the app and the instance finds itself with additional powers, just as nature had intended.
The main blueprint
After moving the factory function code into src, we were left with an empty src/main folder. We will promptly repurpose this folder to house the main blueprint – the blueprint that tells Flask how to render all of our major app components. All of our response and error functions will now be kept in a main package constructor file. Note that we have to use the main.route view decorator associated with the main blueprint.
We also have to use the main.app_errorhandler decorator to handle our 404 response throughout the whole app. Using the main.errorhandler decorator would tell Flask to run this error function only for routes defined by the main blueprint.
src/main/__init__.py
from flask import Blueprint
from flask import render_template

main = Blueprint('main', __name__)

@main.route('/')
def index():
    return render_template('dashboard.html',
            is_active={},
            user_data=get_user_data())

@main.route('/projects')
def projects():
    return render_template('projects.html',
            is_active={'projects': True},
            user_data=get_user_data())

@main.route('/issues')
def issues():
    return render_template('issues.html',
            is_active={'issues': True},
            user_data=get_user_data())

@main.route('/messages')
def messages():
    return render_template('messages.html',
            is_active={'messages': True},
            user_data=get_user_data())

@main.app_errorhandler(404)
def page_not_found(e):
    return render_template("404.html",
            is_active={},
            user_data={}), 404

def get_user_data():
    return {
        'user': 'ahadjinicolaou',
        'role': 'admin',
        'num_issues': 12,
        'num_messages': 2}
After defining the blueprint, we need to register it within the factory function.
src/__init__.py
...
from flask import Blueprint

# factory function
def create_app(config_name):
    app = Flask(__name__, template_folder='./templates', static_folder='./static')
    app.config.from_object(config[config_name])

    bootstrap.init_app(app)

    from src.main import main as main_blueprint
    app.register_blueprint(main_blueprint)

    return app
Remember that chatter about Flask’s URL map? If we print it out now, you’ll see that the endpoints for main_blueprint’s URL rules have been updated to include the main. prefix.
Map([<Rule '/projects' (GET, OPTIONS, HEAD) -> main.projects>,
    <Rule '/messages' (GET, OPTIONS, HEAD) -> main.messages>,
    <Rule '/issues' (GET, OPTIONS, HEAD) -> main.issues>,
    <Rule '/' (GET, OPTIONS, HEAD) -> main.index>,
    <Rule '/bootstrap/static/<filename>' (GET, OPTIONS, HEAD) -> bootstrap.static>,
    <Rule '/static/<filename>' (GET, OPTIONS, HEAD) -> static>])
Of course, this means that we have to change the corresponding endpoints referenced in the templates. A call to url_for('index') for example will be replaced by url_for('main.index').
After relaunching the server and making sure we haven’t broken anything, we should see… no difference. Brilliant.
git checkout cff1a49 to get the current version of the source code.
Summary
After a little bit of futzing with the codebase, we have ourselves a highly modular codebase that allows us to cleanly segment presentation code from application logic. It’s also nice to have the beginnings of what will hopefully become a clean, functional user interface fit for an issue tracker.
I’m also happier after having moved those three project files to more suitable locations – frankly, their previous locations were an afterthought that I should have noticed earlier. Better late than never!