Building an Active Directory lab with Proxmox
Are you the master of your domain?
Over the last couple of weeks, I decided that it would be good to learn a little something about Windows administration. The phrase “active directory” is something that I’ve often heard popping up in discussions about Windows security in the context of both offensive and defensive activity. Since the vast majority of Fortune 500 companies make use of Active Directory in their corporate networks, perhaps it’s no small wonder.
To see what all the fuss is about (and maybe learn a thing or two), I built a virtualized Active Directory lab. As with my previous homelab writeup, I thought it would be good to write this up to consolidate all the loose bits of information that I picked up along the way. For the initial domain controller installation, I took some hints from The Cyber Mentor’s guide for building an AD hacking lab, as well as the documentation for Proxmox for advice on setting up Windows VMs.
Table of Contents
Objectives
My general motive is to learn more about the importance of Active Directory in securing a Windows network. Aside from this, I have some specific plans for how I will put this AD lab to use, which I talk about briefly at the end of the writeup. Most of these plans involve learning something that I have never used or seen in action (PowerShell, group policies, Windows events), so this should be fun!
Requirements
Since most of my immediate goals have something to do with Windows administration, I will be building a Windows “corporate network”, consisting of one Active Directory (AD) domain controller and a fleet of two Windows workstations. In a future project, these will eventually be configured to push event logs to a fourth machine, which will be responsible for event querying and log analysis. All of these machines will be implemented as Proxmox VMs that are connected to the same (virtual) network segment.
To realize this tiny network, I could configure the workstation VMs individually, but setting up an AD domain will allow me to manage the workstations from the domain controller using group policies and PowerShell remote sessions. Individual VM configuration can therefore be limited to the initial OS/driver installation and static IP assignment. I like to think that this approach is scalable and bears some resemblance to how actual sysadmins carry out (a very small subset of) their duties.
For this project, I’ll be recruiting my trusty Protectli FW6B, which has been set up as a Proxmox hypervisor (you can find the corresponding writeup here). This time around, I loaded it with 32 GiB of RAM to better handle the burden of running all these VMs.
Installation
Our Windows network consists of one domain controller (Windows Server 2019) and two workstations (Windows 10 Pro). Proxmox’s documentation recommends a specific set of drivers for Windows VMs that do not come with the OS but promise to enhance device performance. These VirtIO drivers will be loaded during Windows' installation using an extra virtualized CD/DVD reader.
The following disk images will be used:
17763.737.190906-2324.rs5_release_svc_refresh_SERVER_EVAL_x64FRE_en-us_1.iso(Windows 2019 Server)19043.928.210409-1212.21h1_release_svc_refresh_CLIENTENTERPRISEEVAL_OEMRET_x64FRE_en-us.iso(Windows 10 Enterprise)virtio-win-0.1.190.iso(VirtIO drivers)
Domain controller
Our setup will feature a domain, a network of computers that is managed by a domain controller (DC). Of its many responsibilities, the DC is tasked with making sure that all configured application and security policies are respected by all devices on the network. Among other things, we will use the DC to create domain user accounts that allow users to access the domain.
Here’s what DOMCON, the domain controller VM looks like under Proxmox:
- 1 CPU core, 4 GiB RAM
- 32 GiB VirtIO SCSI HDD (write-back, discard)
- VirtIO NIC
- 2x DVD drives (Windows Server 2019; VirtIO driver package)
ide3) is loaded with the VirtIO ISO before powering it on. You should also ensure that this DVD drive has a higher device number than that of the installation media (e.g., 2 in ide2), such that the VM attempts to boot off the Windows ISO first.
Let’s boot up the VM.
Installing Windows Server
After clicking Install at the first installer prompt, you will be asked to select the OS to install. We are going to opt for Windows Server 2019 Standard Evaluation (Desktop Experience) to get a graphical interface. There will be another prompt after you agree to the standard terms of use, asking about the type of installation. Select Custom: Install Windows only to proceed.
Now if you’ve gone with the configuration listed above, you won’t find any available drives to choose in this next screen. This is because Windows doesn’t recognize the SCSI disk drive, as expected. To install the drivers, click Load driver and browse to E:\vioscsi\2k19\amd64, which will yield the Red Hat VirtIO SCSI pass-through controller driver.
After loading the driver, we’re ready for some partitioning. Select the newly-visible drive, click New, and allocate the entire drive for the partition to get the screen below.
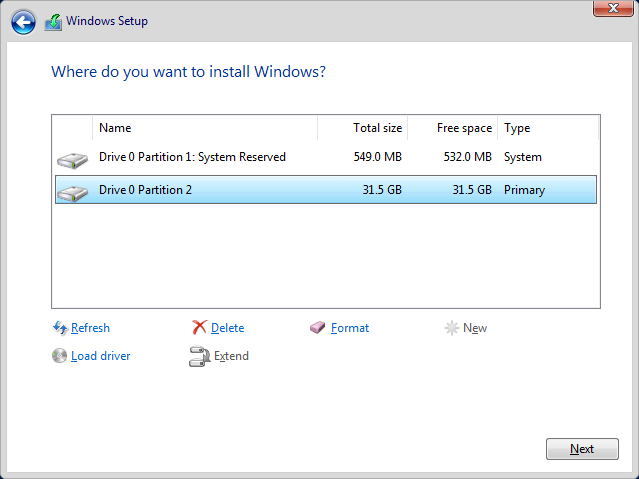
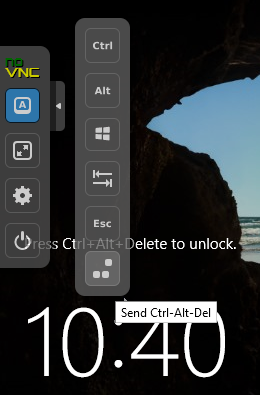
With the second partition selected, click Next and the installation will proceed. Eventually, the system will reboot and you will be asked to supply a password for the local Administrator account. After this, you can unlock the login screen with Ctrl-Alt-Delete and log in with those same credentials.
Configuring the network
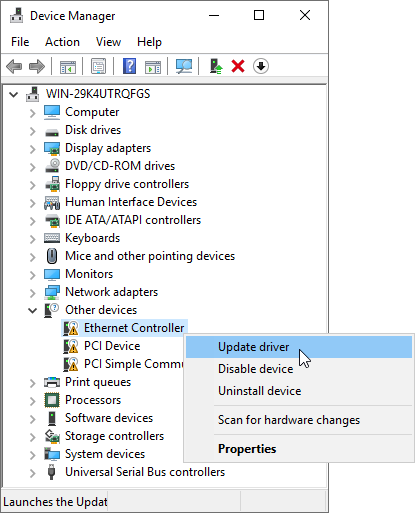
Our first order of business is to establish network connectivity. This means we need to use the VirtIO disk image once more, since our NIC is also a VirtIO device. Enter Device Manager, find the Ethernet Controller and click Update driver (Fig. 3). Searching the E:\NetKVM\2k19\amd64 folder will yield the Red Hat VirtIO Ethernet Adapter driver.
You will now get a prompt asking whether to allow network discovery. It’s a home network, so this is fine.
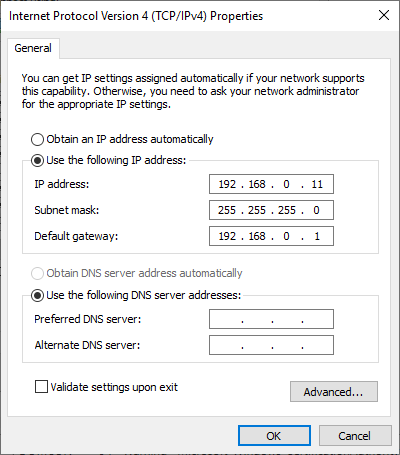
We will now assign this machine with a static IP address. Under Network Connections, access the Properties of the Ethernet adapter and bring up the TCP/IPv4 properties (Fig. 4). Here, the default gateway is pointing to my home router.
After changing the computer name to DOMCON (e.g., right-click This PC » Properties » Change settings » Change), let the VM reboot and log back in. We are now ready to prepare our server to become a domain controller.
Promotion to domain controller
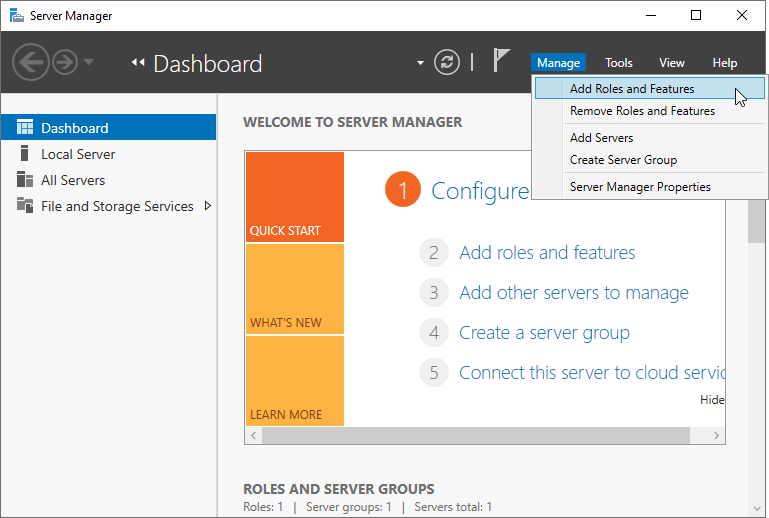
We are going to promote DOMCON to become the DC for our prospective Windows domain. This requires the installation of the AD Domain Services role, which can be initiated by using the Server Manager window (Fig. 5). Click Manage » Add Roles and Features to bring up a wizard and go through it as shown below:
- Installation Type: Role-based or feature-based installation
- Server Selection: DOMCON at 192.168.0.11
- Server Roles: Check Active Directory Domain Services (click Add Features to add the required services/features when prompted)
- Click through to the end and click Install.
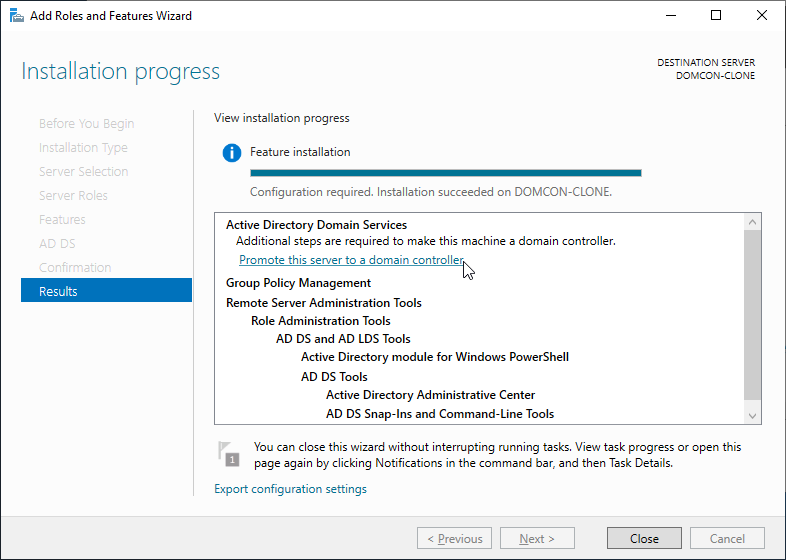
After installation, we are shown a summary of what was installed, as well as a little line of text offering the option to promote the server to a domain controller (Fig. 6). Lovely.
Clicking this brings us to another wizard. At the Deployment Configuration page, select Add a new forest and enter the root domain name. We are running a test lab so our choice of domain name here doesn’t really matter. I will call mine labs.remotelycurious.net. Go through the rest of the wizard and click Install at the Prerequisites Check page. Reboot.
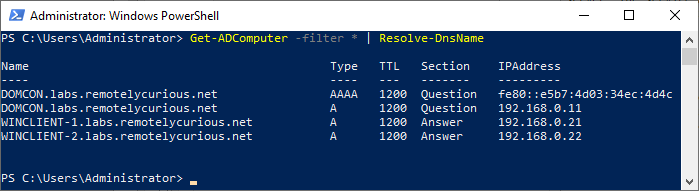
After reaching the Windows login, notice that the Administrator account becomes prefixed with LABS, indicating the presence of the newly-created domain. You will also find that the DC’s preferred DNS server is now configured as itself, i.e., 127.0.0.1.
Workstations
Time to cook up some clients. The installation and initial configuration of these VMs will be very familiar, having just set up Windows Server for the domain controller. Each client VM will have these specs:
- 1 CPU core, 2 GiB RAM
- 32 GiB VirtIO SCSI HDD (write-back, discard)
- VirtIO NIC
- 2x DVD drives (Windows 10 Enterprise; VirtIO driver package)
The steps for setting up WINCLIENT-1 (192.168.0.21/24) are outlined below.
Installing Windows Enterprise
After starting the Windows installation, we click through and arrive at the install location page, as we did in Figure 1. Click Load driver and browse to E:\vioscsi\w10\amd64 to install the Red Hat VirtIO SCSI pass-through controller driver for Windows 10. Allocate the partitions as desired and continue with the installation. Reboot.
Once Windows boots, you will be asked to enter the credentials and security questions of a local user (so long as you aren’t connected to the internet). Go ahead and set these, click through some more prompts, and wait for Windows to finish setting up your local account.
Configuring the network
The VirtIO network adapter needs a driver. Use Device Manager to update the driver using the RedHat one located at E:\NetKVM\w10\amd64. After the driver update, accept the offer to enable network discovery and change the computer name to WINCLIENT-1. Reboot.
To join the domain, the workstations need to be placed on the same subnet as the domain controller. As was done for the server, we will install the NIC driver (Fig. 3) and configure the adapter’s TCP/IP settings:
- IP address: 192.168.0.21/24
- Gateway: 192.168.0.1
- DNS: 192.168.0.11
Join workstation to domain
Click Start, type ‘domain’ and click Access work or school. After clicking Connect, you will find the option to Join this device to a local Active Directory domain below. Go ahead and enter labs to access a login prompt, and enter the labs\Administrator credentials to make the connection.
After restarting, the VM will be joined to the domain. Repeat the process for WINCLIENT-2 and a different IP and you will have yourself a “fleet” of two computers that can be centrally managed by the domain controller.
Configuration
Now that the workstations have been linked up to the domain, we’re ready for some configuration. An enterprise needs users, so we will need at least one of those. I’ve also decided that it will be useful to have the option of managing the workstations remotely through PowerShell sessions, as mentioned earlier.
Add an active directory user
User accounts can be created using the Active Directory Users and Computers app, but it is relatively easy to do this through PowerShell. Open up a shell as Administrator and run the command below to create a new AD user account for Steven Strange (mind the ticks that let the command span multiple lines).
New-ADUser `
  -Name "Steven Strange" -GivenName "Steven" -Surname "Strange" `
  -SamAccountName "sstrange" `
  -ChangePasswordAtLogon $False `
  -AccountPassword $(ConvertTo-SecureString "Letmein123!" -AsPlainText -Force) `
  -PassThru | Enable-ADAccount
There are a few things to note here:
- the
SamAccountNameparameter is mandatory; all others are optional, - the account password is set using an encrypted string object (
System.Security.SecureString), evaluated using the$(...)subexpression, - the
PassThruoption tells theNew-ADUsercommand to return the new AD user object, which we then pipe toEnable-ADAccountto save us an extra step (new accounts are disabled by default).
After verifying that we can log in as Steven Strange on one of the client VMs, we can go ahead and set up remote management for the fleet.
Configure remote management
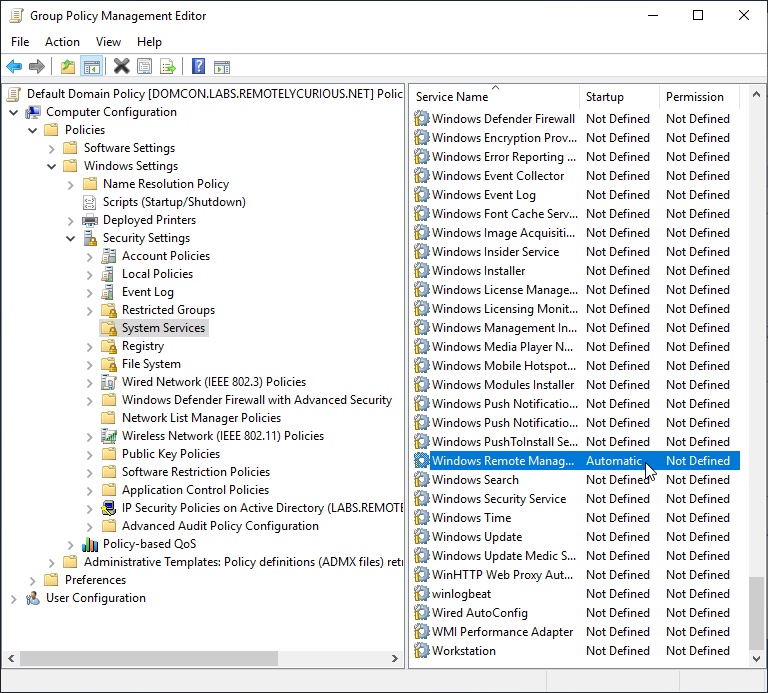
The goal of this stage is to enable Windows Remote Management (WinRM) throughout the domain. We can do this through the application of three different policies within the Group Policy Management app. Navigate to Domains » labs.remotelycurious.net » Group Policy Objects » Default Domain Policy, right-click and click Edit to bring up the Group Policy Management Editor.
1. Enable Remote Management (WinRM)
Find Windows Remote Management under Computer Configuration » Policies » Windows Settings » Security Settings » System Services, right-click and hit Properties. Check Define this policy setting and select the Automatic service startup mode before clicking OK.
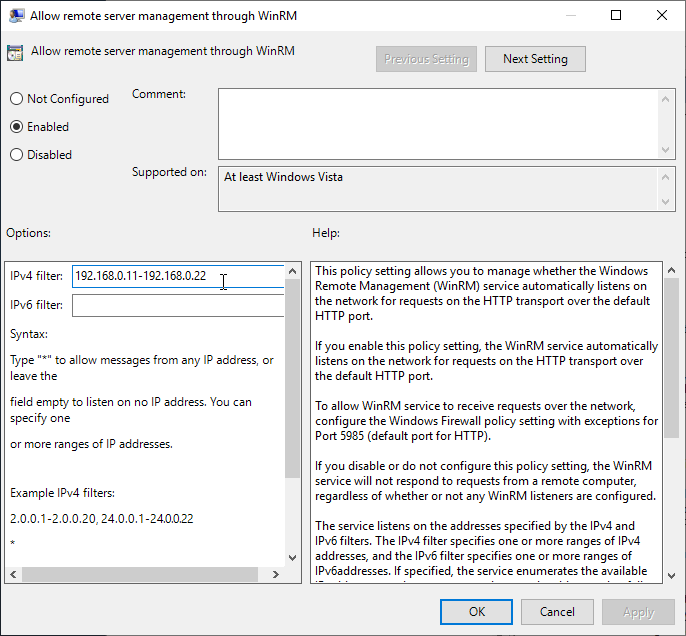
2. Allow remote management through WinRM
After enabling the service, the next step is to actually allow it to operate. Find the Allow remote server management through WinRM setting under Computer Configuration » Policies » Administrative Templates » Windows Components » Windows Remote Management » WinRM Service, right-click and choose Edit.
Here we can choose which IPs will be allowed to establish a remote connection. After enabling the setting, fill in the IPv4 field appropriately and click OK. In my case, the Windows network spans from 192.168.0.11 to 192.168.0.22, and I want to be able to remote from any PC to any other one, just for fun.
3. Add WinRM firewall exception
We’ve hit the last stretch, in which we have to allow the remote connection through the firewall. This is done by making an inbound port exception for the WinRM service, which runs on port 5985. Dig up the Define inbound port exceptions setting under Computer Configuration » Policies » Administrative Templates » Network » Network Connections » Windows Defender Firewall » Domain Profile, right-click and choose Edit.
After clicking Enabled, click Show under Define port exceptions. Each exception is specified in the format <port>:<transport>:<scope>:<status>:<name>, where
transportis either TCP or UDP,scopeindicates the originating networks that are allowed through the firewall,statusis either ‘enabled’ or ‘disabled’, andnamecan hold a short description of the rule.
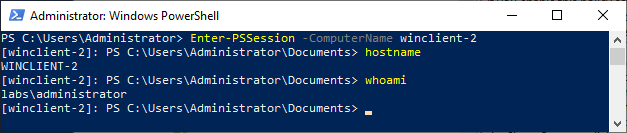
I will enter 5985:TCP:localsubnet:enabled:WinRM to allow local TCP connections through port 5985. That should do it, but the proof is in the pudding. Let’s try to connect to WINCLIENT-2 from the domain controller. Does it work?
Summary
We have ourselves a miniature enterprise Windows network, complete with a domain controller and remote management capabilities. There are certainly ways I can make it better (maybe configure WinRM to use TLS?) but it will do the job for now.
I’m really keen to see if I can use this network as a platform for threat detection. Right now, my thinking is to set up event forwarding such that a selection of Windows events from the AD network is shipped to an Elastic Stack SIEM for log analysis. The idea would be to generate test threats (maybe with Atomic Red Team) and see if I can detect any malicious activity using Elasticsearch queries.
But, that’s a post for another day.