Building a homelab with Proxmox
Or, the things I will do to avoid running multiple VMs on my laptop.
It turns out that the journey to setting up a homelab is filled with trapdoors and snake pits.
This writeup is largely for documentation purposes – it’s written as a note to my future self who might look to recreate this setup and wonder why certain design decisions were made. My goal is to avoid having to rediscover all of the little hazards that can (and did) result in hours of frustration. That said, my hope is that other people with similar goals can learn from my experience and save themselves from navigating seas of browser tabs in search of enlightenment.
By the time my homelab took shape, I had made use of all sorts of resources on the topic. One of the best belongs to Dan Ford, whose excellent homelab writeup series really helped me to get started. The documentation for Proxmox and pfSense was also useful. Aside from these, there were also many valuable snippets of information, forum posts and docpages scattered throughout the internet, which have been cited where appropriate.
Table of Contents
Objectives
There are a lot of reasons you might want to build a homelab. Many of them have to do with learning something. My short-term goal is to learn system administration (things like configuring firewalls and networks, managing security policy, etc) but eventually I want to learn more about network intrusion detection. I’d be curious to see if I could break into my own network – and what that would look like from the perspective of a sysadmin.
Requirements
A homelab can take many forms, from an array of physical computers mounted on racks, to a book-sized unit hosting a virtualized computer network. In this section I discuss the major constraints and design decisions that guided my approach.
Hardware
Since I like quiet and despise both heat and clutter, the first major constraint was that this homelab needed to be virtual. This means the homelab is going to be implemented by a bare-metal hypervisor1, on a host computer with a low noise, power, and physical profile. In the end I went with the Protectli FW6B. It’s a silent, well-built unit that comes with a dual-core i3-7100U and 6x Intel Gigabit NICs. I opted to load it with 2x8 GiB of DDR4 RAM and 480 GiB of mSATA storage. This is definitely overkill for a bunch of lightweight VMs, but I’ll be putting this little box to good use in future projects.
Hypervisor
After a couple hours of internet research, I decided to run with Proxmox as my hypervisor. People also seem to be pretty happy with ESXi, but my decision largely came down to favoring an unrestricted, open-source solution. I’m definitely not a seasoned practitioner, so it’s unlikely that I would really be able to appreciate the difference between the two products right now.
Network
To start with, having some virtual machines running on an internal network, isolated from the home network by a firewall, sounds like a good idea. pfSense is a well-regarded firewall whose documentation specifically includes guidance on running it as a VM in Proxmox, which is exactly what I want to do. It also can be configured as an intrusion detection/prevention system by way of add-on packages like Suricata and Snort, something I’m keen to play around with in the future.
Although I’m generally comfortable with vanilla home networking, there’s a lot of uncharted territory for me in this project. To limit what could go wrong, I will keep things simple and just focus on getting a basic system up-and-running. This means leaving things like VLAN configuration and SSH access for another homelab iteration.
The schematic for the eventual homelab is shown below:
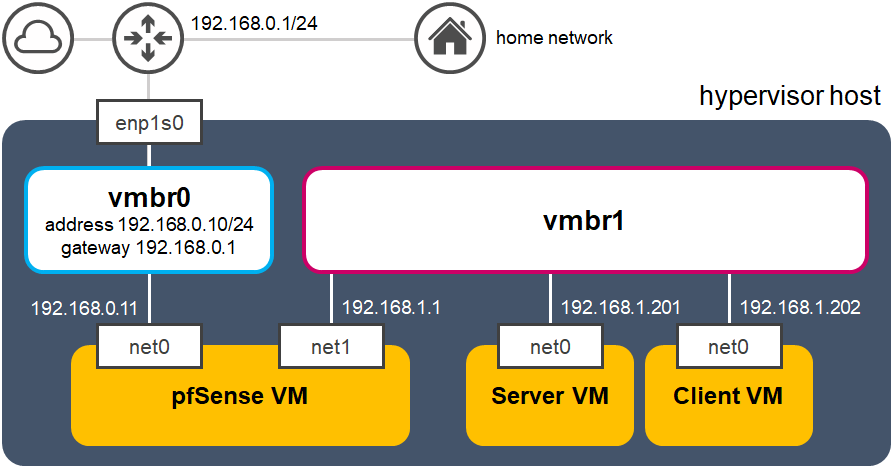
vmbrx) and three VMs.
Installation
Before beginning, you should have the following:
- $\geq$8 GB USB flash drive
- Rufus installer (
rufus-3.10.exe) - Proxmox VE ISO image (
proxmox-ve_6.2-1.iso) - pfSense ISO image (
pfSense-CE-2.4.5-RELEASE-amd64.iso) - Linux ISO image (
CentOS-8.1.1911-x86_64-dvd1.iso)
Rufus will be used to wipe and format the USB drive as a bootable installation drive2, so please make sure it’s not holding anything of value! Once you’ve selected the USB drive under Device and the Proxmox ISO image under Boot selection, go ahead and click Start. You might get a couple of prompts:
- “Download a newer version of GRUB?” → No
- “Write as an ISO image or DD image?” → Write in DD Image mode
Once the disk is written, plug it into your homelab host and turn it on. Immediately hold down ESC or DEL and let go once you’ve entered the BIOS.
Within the BIOS, find the boot section and either reorder the device list such that your USB drive comes first, or if there’s an option to immediately boot from a selected device, use that to boot from the drive. Selecting Install Proxmox VE from the menu that pops up will launch the installatoon process.
Installing Proxmox
While going through the installation process, you will have to make some important decisions. The first of these concerns what file system to use on the host.
File system
If we ignore Ext3, we have three choices: Ext4, XFS, and ZFS. The default file system, Ext4, was designed to be backwards-compatible with older file systems. It’s known for stability, which is probably the reason why it’s the default file system on most Linux distributions. XFS is another mature solution that is particularly well-suited for servers that deal with many large (exbibytes) files.
ZFS is a next-generation file system that was designed to eliminate many issues found in legacy file systems. ZFS is probably the way to go for someone who knows what they’re doing (and doesn’t need support for enormous files) – you get great performance, configuration flexibility, and access to enterprise-level features, in return for a larger memory footprint and a bit more configuration.
Since I’m just learning the ropes and don’t really need advanced features and capabilities, I left Proxmox with Ext4 as the default choice. You would only see the option to change this by clicking Options next to the Target Harddisk dropdown during the installation, so keep this in mind if you want to choose a different file system3.
Network configuration
Proxmox will eventually ask you to confirm your network configuration. The IP address here will be accessed by a browser on another computer on your network, allowing you to perform hypervisor management through a web interface. Choose an IP address that is on the same network segment as your router (and home network). If your router is running DHCP, you want this management address to be outside of the DHCP pool.
I’ve selected 192.168.0.10/24 as the management IP address, with the address of my router (192.168.0.1) as the gateway. Keep the management address handy. I’ve also gone with a FQDN (fully-qualified domain name) of pve.alex.home, which implies the hostname pve.
/etc/hosts and (b) /etc/network/interfaces. We’ll look at the latter configuration file later on.
Configuring Proxmox
After the installation has finished, remove the USB drive and reboot. You’ll eventually see a prompt that asks you to configure Proxmox by visiting https://<MANAGEMENT-IP>:8006. Provided you’ve configured the network settings properly, you will be able to access the web GUI from another computer in your home network by entering that address in a browser. Once you’ve supplied your credentials (user root and the password you specified earlier) and logged in, you are ready to start configuring the hypervisor.
Enabling software updates
At this point, it’s a good idea to enable software updates. Proxmox is configured by default to access the software repositories for subscribed customers, which are not accessible to those without a subscription. We’re going to configure Proxmox to access the community repositories instead.
Let’s take a quick look at the interface. On the left you’ve got the resource tree, a column that gives you an overview of your hypervisor (Fig. 2, left column). Underneath Datacenter, you’ve got a single node with hostname pve. One more level down lists all the VMs and logical storage devices associated with the node. At the moment there are no VMs and two shared storage objects called local and local-lvm that resulted from the default Proxmox installation options. The local-lvm object holds VM disk images, while the local object holds backup files and ISO images. We’ll be dealing with local shortly.
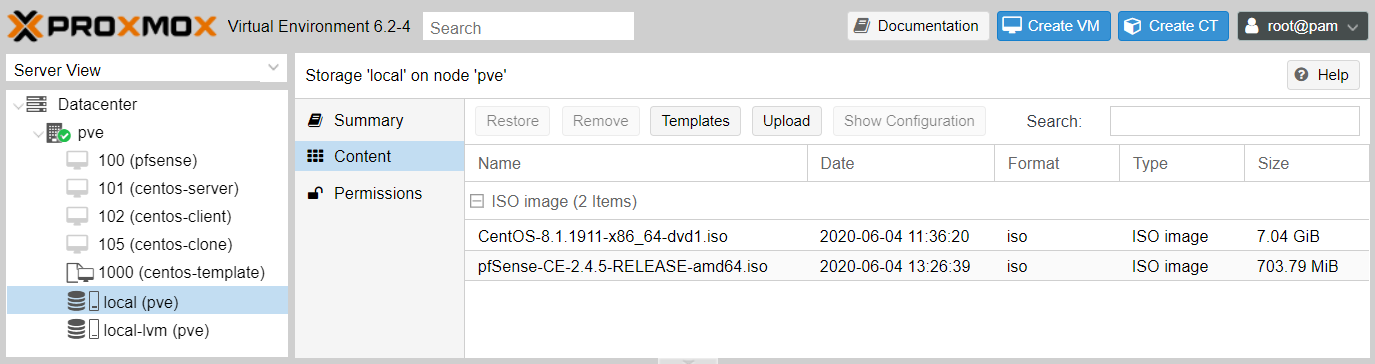
pve. Right panel: ISO images in local shared storage after uploading to the host.
The toolbar in Fig. 2 above (with title Storage ‘local’ on node ‘pve’ and button Help on the right) will change according to the selected resource in the tree. Clicking the pve node will bring up node-specific toolbar buttons, like Reboot, Shutdown, and Shell. Go ahead and click that Shell button.
Time to configure the software repositories. Debian (Proxmox’s underlying operating system) makes use of apt (Advanced Package Tool) to manage and update software. We are going to navigate to the directory that holds the repository configuration, rename (and effectively disable) the config file, and create a new config file containing a link to the community repositories.
cd /etc/apt/sources.list.d
mv pve-enterprise.list pve-enterprise.list.original
echo 'deb http://download.proxmox.com/debian/pve buster pve-no-subscription' > pve-community.list
buster is the name of the Debian release used by Proxmox 6. Make sure to use the release name for your version of Proxmox.
You can now run apt update and apt dist-upgrade to download and install all available updates.
Uploading ISO images
Before we can start making VMs, we need to upload the ISO installation media. Click the local storage object Content tab to bring up a (currently empty) list of items sitting in the storage. After using the Upload button to store the pfSense and CentOS ISO images, the list will look like Fig. 2 (right panel).
Configuring the virtual network
As mentioned earlier, the host will have two network segments: one that allows the host to communicate with the home network, and an internal network segment, insulated by a firewall. This section talks about the configuration needed to prepare the virtualized network for the firewall.
Virtual switches
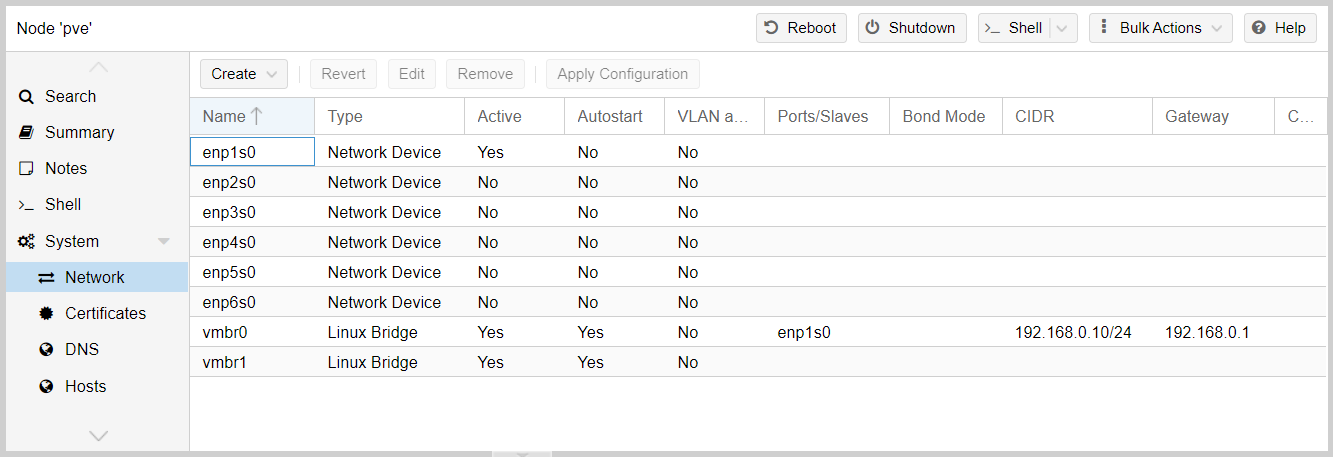
The network components available to Proxmox can be found by clicking the pve node System tab group Network tab. The Protectli box has six NICs, which are listed as enp[1-6]s0 in Fig. 3 below as Network Devices.
You’ll also see something called a Linux Bridge, named vmbr0. This behaves like a network switch, allowing for communication between devices using both virtual and physical interfaces. Currently it’s associated with one physical interface (enp1s0), through which the host is connected to the router. The bridge is also associated with Proxmox through its management IP address (192.168.0.10/24). If we connected a VM to vmbr0 and gave it an IP address from the same subnet, that VM will gain access to both Proxmox’s management interface and the router. We’ll be doing exactly this for pfSense.
vmbr0 to be bound to an IP address on the home network subnet, 192.168.0.0/24.
Forwarding between (private) networks
Now we’re going to focus on the internal network segment, which needs its own Linux Bridge. Make one and call it vmbr1, without assigning an IP address or any other settings to the bridge. The internal network will make use of the subnet 192.168.1.0/24.
As useful as Proxmox’s web interface is, we cannot use it to completely configure the virtual network for our use case. To make this work, we need to directly edit the /etc/network/interfaces file to ask Proxmox to do two things for us:
- forward IP packets across different network segments, and
- use IP masquerading.
The effect of (2) will be to allow all devices in the internal network (each with their own private IP address on the internal subnet) to communicate with the outside world using a single “external” IP address – the address of the host.
If we take a look at /etc/network/interfaces, we will see the six physical interfaces, enp[1-6]s0, as well as vmbr0 and vmbr1. The configuration for the two Linux Bridges is shown below:
auto vmbr0
iface vmbr0 inet static
        address 192.168.0.10/24
        gateway 192.168.0.1
        bridge-ports enp1s0
        bridge-stp off
        bridge-fd 0

auto vmbr1
iface vmbr1 inet manual
        bridge-ports none
        bridge-stp off
        bridge-fd 0
We can confirm that only vmbr0 has an IP address and gateway, allowing for communication between the host, router, and firewall on the 192.168.0.0/24 subnet.
At the end of the file, we will add the following three lines:
post-up echo 1 > /proc/sys/net/ipv4/ip_forward
post-up iptables -t nat -A POSTROUTING -s '192.168.1.0/24' -o vmbr0 -j MASQUERADE
post-down iptables -t nat -D POSTROUTING -s '192.168.1.0/24' -o vmbr0 -j MASQUERADE
The first line enables packet forwarding after the interface has been brought up, and the next two lines conditionally add/remove a rule for Proxmox’s firewall. Let’s break it down:
-t nat -A POSTROUTING: the rule gets added to the POSTROUTING NAT table, to alter packets as they leave the interface,-s '192.168.1.0/24': the rule applies to any packet whose source IP belongs to the internal network,-o vmbr0: matching packets get sent to interfacevmbr0,-j MASQUERADE: matching packets get their source IP replaced by that ofvmbr0.
In the last line, instead of adding the rule after the interface is brought up, the rule is removed after the interface is brought down.
To summarize, the effect of this extra configuration is to take packets that are heading out from the internal network (e.g. with source IP 192.168.1.99), replace their source IPs with 192.168.0.10, and send them on their way. When an internal VM’s network request is reciprocated by a public server, the server will send packets that are addressed to Proxmox, which will intercept and redirect those packets back through the firewall.
Installing pfSense
We are finally ready to create our pfSense virtual machine! In this homelab iteration, the firewall is just going to have a small amount of configuration to control administrative access and configure DHCP to assign IP addresses to two CentOS VMs (a client and a server) using their MAC addresses.
Since there’s not going to be any heavy traffic processing going on here, I’ve opted for a single-core VM (hostname pfsense) with pfSense’s minimum hardware requirements (512 MiB RAM and 4 GiB of disk space), using the Create Virtual Machine dialog to choose a VirtIO SCSI controller and VirtIO network device connected to the vmbr0 bridge.
Now we’ll add another network device to the VM. In the resource tree, click the pfsense VM Hardware tab Add dropdown button Network Device, to connect vmbr1. Now the pfSense VM has two NICs: net0, connected to vmbr0, and net1, connected to vmbr1. Start up the VM and install pfSense with all of the defaults.
Configuring pfSense
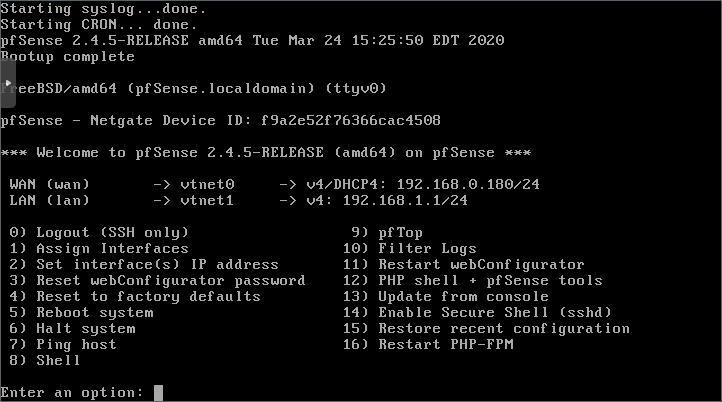
After installation and a reboot, pfSense will ask whether you want to set up VLANs. We’re not doing this, but before you proceed, make sure you see two valid interfaces, vtnet0 and vtnet1, listed above the prompt. Next, you’ll get a couple more prompts:
- “Enter the WAN interface name” →
vtnetx - “Enter the LAN interface name” →
vtnety
vtnet0 is vmbr0). Check that the listed MAC addresses match the ones found under Datacenter pve node pfSense VM Hardware tab.
The WAN interface is the firewall’s untrusted entrance. If I were confident that these homelab shenanigans wouldn’t eventually disrupt my internet connectivity, I’d arrange for the firewall to handle internet traffic directly, before forwarding traffic to the home router and network through the firewall’s LAN interface. (But I’m not. At least, not yet!)
After confirming the above information, pfSense will continue booting and eventually present you with a menu (Fig. 3). In my case, the router has allocated pfSense’s WAN interface an IP address, 192.168.0.180/24. That is a nice gesture, but I want to give it a static IP address. After choosing option 2, enter the WAN’s new IP address as 192.168.0.11/24 and a gateway of 192.168.0.1. Enter no when asked to revert to HTTP as the webConfigurator protocol (this is unimportant right now). Time to reboot.
Using the setup wizard
Once we’re back at the menu, we can access the management GUI using the WAN interface IP address, although we need to temporarily disable the firewall to access it. Choose option 8 to enter the shell, run pfctl -d to bring down the firewall, and then enter 192.168.0.11 in a browser on your home network. After supplying the default credentials (username admin, password pfsense), you’ll be brought to pfSense’s setup wizard. I’ll highlight some important configuration below (with the steps in parentheses):
- (2/9) Hostname/domain: nice to make these match your Proxmox details,
- (2/9) Primary/secondary DNS Server: as above,
- (3/9) Timezone: choose yours,
- (4/9) Static IP configuration: make sure these details are correct (
192.168.0.11/24, with gateway192.168.0.1), - (4/9) RFC1918/bogon networks: uncheck the two boxes to allow private/non-internet routed networks through the WAN interface – this firewall will of course be dealing with these kinds of networks,
- (5/9) Configure LAN interface: make sure these details are correct (
192.168.1.1/24) – this will be the gateway for the VMs in the internal network, - (6/9) Set admin webGUI password: now’s a good time!
Setting the admin password will trigger an update, after which you will get kicked off the management GUI. Go ahead and reboot the pfSense VM. We haven’t yet made allowances for management access in the firewall, so once it’s ready you will have to once again disable the firewall (pfctl -d) before logging back in with your new credentials.
Playing nice with VirtIO
If you try moving through different parts of the web interface, you might notice that it seems a bit sluggish. This comes about from an issue with using VirtIO network drivers to interface with pfSense, which can be resolved by changing a couple of settings as recommended by the documentation (section Configuring pfSense Software to work with Proxmox VirtIO).
Click the System header menu Advanced Networking tab and scroll to the bottom to the Network Interfaces section. Make sure these boxes below are checked:
- Disable hardware checksum offload
- Disable hardware TCP segmentation offload
- Disable hardware large receive offload
Allowing administrative access
Our next order of business is to allow ourselves administrative access, so that we don’t have to tear down our firewall every time we need to perform some management. We are going to do a couple of things here:
- define aliases to specify IP management ports,
- use these aliases to allow pfSense management through those ports.
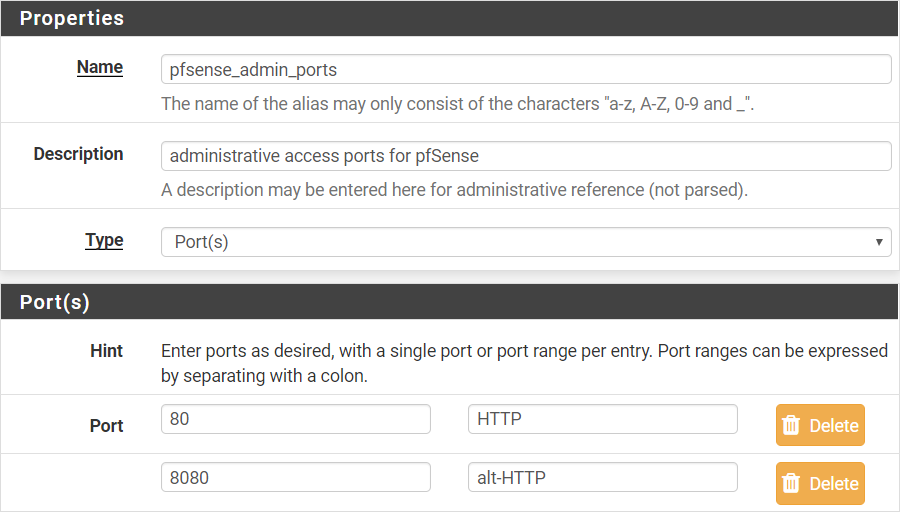
To define the aliases, click the Firewall header menu Aliases Ports tab, and then click Add. We will allow management through ports 80 (HTTP) and 8080 (alt-HTTP). When you’ve got these ports listed as in Fig. 4 below, save and apply the changes when prompted.
Now we will add a rule to allow management traffic through the WAN interface. The rule we add will act on inbound packets at the interface. Click the Firewall header menu Rules WAN tab, and then click Add.
Stepping through the configuration:
- Edit firewall rule: pass TCP IPv4 traffic through the WAN interface – you will find that the default settings under this heading work for us,
- Source: allow access to home network devices, so specify Network and enter
192.168.0.0/24, - Destination: match traffic headed for this firewall (select this in the destination dropdown) through the management ports (fill out the Custom port ranges with the alias
pfsense_admin_ports), - Extra options: fill out the description with something like “allow administrative access from home network”.
After saving the new firewall rule, we will get pfSense to provide access to the management interface through the alternative HTTP port. Click the System header menu Advanced Admin Access tab, enter 8080 in the TCP port field, and apply the changes.
8080, as some systems require full administrative privileges to access port numbers lower than 1024 (like the HTTP port 80, for example).
Now we can freely manage the firewall through the web interface! You can either reboot the router or run pfctrl -e to bring the firewall back online.
Creating the internal network
We’re now going to create two CentOS VMs: a client VM and server VM. In reality they will be pretty much identical (save for their NIC MAC addresses) but they will play certain roles as I learn the ropes of system administration. I will then configure pfSense to assign each VM with an IP address that allows them to communicate.
Setting up a CentOS VM is pretty straightforward. The first one will have the hostname centos-server. It will have 1 CPU, 2 GiB RAM, 20 GiB of hard disk space, and be connected to vmbr1. Here we will choose a non-paravirtualized NIC model, the Intel E1000.
ping google.com but could not curl google.com. This was the cause of hours of madness, until this forum post gave me a hint. There is apparently an issue with a VM using paravirtualized network drivers to communicate with pfSense, but it’s not at all clear why.
Once you’ve run through the installation and logged in, you should be able to access the internet through the VM (provided you’ve got a working DNS configuration). Now the VM can be cloned to yield centos-client and there will be two functional VMs on the internal network, with full internet connectivity.
Restricting access
We’re pretty close to achieving the design goal. The main issue is that right now, the firewall isn’t really doing much. Now I want to restrict access to whitelist these two CentOS VMs and nothing more. To do this, I’ll make use of pfSense’s DHCP service to map each MAC address to a static IP address on the internal network segment.
Mapping VMs to IP addresses
The MAC address of a given VM can be accessed by selecting the VM in the Proxmox resource tree Hardware tab and double-clicking the Network Device row associated with vmbr1. Grab the server and client MAC addresses and keep them handy. Incidentally, I’ll be assigning centos-server to 192.168.1.101 and centos-client to 192.168.1.102.
Let’s head back into the pfSense web interface and click the Services header menu DHCP Server. At the moment, the VMs are getting their IP addresses from the available range indicated at the bottom of the General Options section. Set the range to 192.168.1.220 to 192.168.1.240 and click Save. The specific range isn’t too important – we just want the range not to include any of the static VM addresses.
At the bottom of the page there’s a section called DHCP Static Mappings for this Interface, which sounds like what we want. Click Add to add a mapping for both VMs, filling out the MAC address, client identifier, IP address, and hostname for each mapping (Fig. 5).

We can now bring a VM’s interface down and back up again to reassign the IP address, confirming the change with the last command:
nmcli connection down ens18
nmcli connection up ens18
ip address show ens18
Blacklisting unknown devices
For our final act, we are going to block traffic leaving the internal network from all unauthorized devices, i.e., anything other than centos-server and centos-client. This can be done by whitelisting the network 192.168.1.100/30 and blocking everything else.
In the pfSense interface, click the Firewall header menu Rules LAN tab. We will create a rule to pass IPv4 packets from any protocol with a source IP coming from the network 192.168.1.100/30. After disabling any other rules and applying the changes, we have successfully locked down the internal network. You can confirm this by manually setting one of the VM’s IP addresses to a non-whitelisted address and running curl google.com.
Summary
At last, the homelab is up and running! There is of course a lot that can be done to improve this setup, particularly in the way of security. I think it would be a great idea to configure VLANs and enable SSH access for firewall management in the next homelab iteration, but for now it can serve as a testbed for all sorts of administrative tasks.
-
Another solution would be to implement the lab on a cloud platform. ↩︎
-
See this article from Red Hat for a good discussion about how to choose a file system (although they conspicuously do not mention ZFS). ↩︎